Hi neighbors! Recently I finally took the plunge and brought home a whole Iberian ham. I thought I had achieved “ham freedom,” but facing this giant, holding a knife, I felt quite lost… I believe many beginners share the same confusion. After some research and practice, I’ve summarized a few insights to share with you, hoping to help fellow newcomers!
Preparation: Sharpening the Tool Before Cutting Wood
Before starting to “dissect” this expensive ham, a handy set of tools is a must. Don’t think about using your kitchen knife — that would be a disaster. What you need are:
- Ham stand: The core equipment to firmly fix the whole ham. Without it, the ham will roll around and be very dangerous.
- Ham knife: A very long, narrow, and flexible knife used to slice thin pieces.
- Boning knife: A short, sturdy knife for separating and removing meat around the joints.
- Sharpening steel: Keep the blade sharp before and during slicing for better results.
The First Cut: Where to Start?
Place the hoof upwards, securely fixed on the ham stand. This direction allows us to start slicing the part with the most and freshest meat—the Maza. This is my personally recommended starting point according to the Spanish ham breakdown process, as the meat here is softer, easier to slice, and quickly builds confidence!
The very first cut is critical. About two to three finger widths below the ankle, use the boning knife to deeply cut a circle down to the bone. This is called “opening the window,” setting the boundary for subsequent slicing. Then, starting from this ring-shaped cut, remove the thick yellow fat layer and hard skin downward, revealing the beautiful deep red muscle inside. Pay attention to not removing all the fat at once; only remove enough fat for the portion you plan to eat that day.
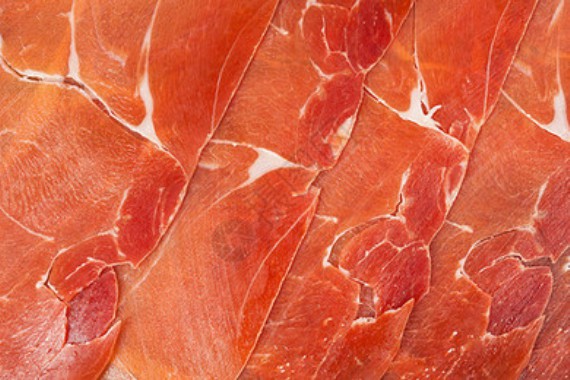
Slicing in Progress: The Art of Paper-Thin Cuts
Now comes the most exciting part! Hold the long ham knife horizontally and use the whole blade length to gently and saw back and forth while slicing. Remember, it’s a “pull” motion, not a push—let the sharpness of the blade do the work. Ideal ham slices should be translucent, 4-6 centimeters long, each piece tipped with a perfect ring of white fat, which is the essence of the flavor!
Slicing Direction and Techniques
Keeping the cutting surface flat is key to producing beautiful ham slices. Always slice from the hoof towards the hip bone. Here are some tips:
| Tip Point | Key Action |
|---|
| Blade angle | Keep the blade always horizontal, parallel to the ham surface |
| Slice thickness | As thin as possible, thin enough to slightly see the blade through the slice |
| Safety aid | Never place it in the knife’s path! Safety first! |
| Fat handling | Don’t discard the white outer fat layer; use it to cover the cut surface to preserve freshness |
Storage and Aftercare
You won’t finish it in one sitting, so proper storage is vital. Cover the cut surface with a large, clean piece of the white fat you trimmed earlier. It effectively prevents drying and oxidation. Then cover it with a clean, preferably cotton cloth, and keep it in a cool, ventilated place. Never use cling film! That suffocates the ham and produces unpleasant odors.
Once you’ve sliced the Maza side down to the hip bone, you can flip the ham, hoof down, and start slicing the other side called Contramaza!
That’s it for my beginner’s guide, the opening Spanish ham process, and here is the Spanish ham production process. If you have any special slicing tips or painful experiences, please share them in the comments!